Highly Functional Virtual Teams

One of the “happy accidents” I discovered while coaching virtual instructors is that they told me the techniques were really useful in engaging a virtual staff during meetings. I’ve also found them helpful as a cross-site or cross-geo team lead. (I’ve led several virtual project-close celebrations using shipped party favors, video conference rooms, and annotation tools.) I wanted to share the info on this free learning session. I’ve studied under Jennifer Hofmann for a while and she is always enlightening. She’s been managing virtual teams for many years.

May 27, 2015, 1-2 PM US Eastern Time:  Jennifer Hofmann, President of InSync Training, presents Creating Highly Functional Virtual Teams.

Can a virtual team be as effective as a co-located team? This is a question that organizations are debating, and the arguments on both sides are very compelling. Factors like work-life balance and organizational savings need to be balanced with the value of face-to-face collaboration and managerial oversight.

Whether you personally embrace the concept or not, chances are you will participate as a virtual team member during your career.

The reality is, a virtual team can be very effective if the correct conditions are met and maintained. It’s about putting together the right personalities, ensuring they have the right tools, and leading the team successfully. After discussing the arguments for and against establishing a virtual team, this workshop will use real life examples to address six key enablers for success.

LEARNING OUTCOMES:

  1. How to form the virtual team: Identifying the profile of an effective virtual team and its players, and how to engage existing team members in selecting new team members.
  2. How to enable the virtual team: Ensuring the right technologies and processes are in place to ensure success.
  3. How to maintain the virtual team: Creating inter-reliability, trust, and teamwork.
  4. How to protect the virtual team: Identifying and managing issues before they become destructive.
  5. How to lead the virtual team: Establishing credibility while maintaining the right balance of oversight and empowerment.
  6. How to reward the virtual team: Creating team building opportunities across the distance.

Webinar Report-Out: Making Virtual and Blended Learning Work for Adult Learners

I attended Jennifer Hoffmann’s Making Virtual and Blended Learning Work for Adult Learners. She modeled the session after Malcolm Knowles’ six principles of adult learning, which promotes collaborative learning over lecture:

  1. Adults are internally motivated and self-directed
  2. Adults bring life experiences and knowledge to learning experiences
  3. Adults are goal oriented
  4. Adults are relevancy oriented
  5. Adults are practical
  6. Adult learners like to be respected

I agree with all of these principles. As we design for and facilitate sessions in the live virtual classroom, they should guide our treatment of adult learners. They don’t want to be treated like novices or children.

Additionally, I always use Wlodkowski and Ginsberg’s Motivational Framework for Culturally Responsive Teaching as a rubric to make sure I have built in activities that address learner needs to increase the likelihood that they will apply the learning. The framework suggests fulfilling these four criteria:

  1. Establish Inclusion– Create an environment of mutual respect and connection. This can be done by posting participant and instructor bios, allowing participants to choose their own work groups, and creating a quick orientation to help students learn how to learn in the VC. An excellent example of an orientation by Insync TrainingLearn How to Learn Online
  2. Develop a Learning Attitude– Set ground rules and mutual expectations as a class. Facilitators can gauge the needs of the participants using annotation tools to involve everyone.
  3. Enhance Meaning– Meet learner needs by making the content relevant and personally meaningful. Use polling and annotation tools to help participants provide feedback. Find out why they chose this class. Are they trying to solve a problem? How do they plan to use what they learn?
  4. Engender Competence– Create experiences where participants can perform–>receive feedback–>make adjustments–>perform. Provide simulations and simple performance assessments via the VC, web-based resources. If it is impractical to perform in the virtual classroom then give an assignment to perform back on the job with criteria that a  peer or manager can use to give feedback.

Don’t Punish the Learner

Jane Bozarth posted a great piece on her Bozarthzone blog called Punish the Learner. Don’t worry, she isn’t advocating punishment. She speaks of the crippling power of a single bad learning experience and how it sometimes takes decades to recover. In particular, she gives the example of a six year old girl at her first piano recital. High expectations have been placed on her to perform in an unfamiliar environment with a large audience and no sheet music. The result was so devastating that she didn’t touch another musical instrument for more than 50 years.

I’m a huge fan of providing a safe place to practice new learning within the Learning experiences I design. I model this on step 4 of Raymond Woldkowsi’s Motivational Framework for Culturally Responsive Teaching. Step 4 focuses on Engendering Competence. This means providing the learner a supportive environment to practice application of the new skill, receive feedback, and try again.

I think it’s also important to have performance support tools in place once the learner has walked onto the “stage” of the workplace to perform with peers and the boss watching. Some refer to this as a supportive scaffolding. I like to call it the Life Line. If you’ve ever watched the program Who Wants to Be a Millionaire? you might remember the available “life lines” a contestant may use if they get stuck answering a question. The original three life lines were:

  • Fifty-Fifty–remove two incorrect answers
  • Phone-a-Friend–a thrity second phone call to a smarty pants friend for help
  • Ask the Audience–audience members use feedback remotes to tell the contestant which answer they think is correct.

What if workplace learning had life lines? What if every learner was given permission to call the instructor for help if they got stuck? What if former students joined an alumni group and answered questions from those who just completed the class and were trying things out back at their desk? What if every learner had the equivalent of sheet music to get them through the performance?

I constantly challenge myself to think of ways to support learners well after the initial Learning Event is over.

What are the most successful “Life Lines” you have provided to learners?

Live Virtual Experiences *Can* Be Intimate

If I told you that a live virtual experience could actually be intimate would you believe me? What if I showed you? Imagine you were preparing to play an instrument and record a song with someone in your studio. Now imagine that “someone” is orbiting the Earth in the International Space Station. Have a look for yourself.

ISS

On 7 Feb 2013 Canadian Chris Hatfield recorded a song with the Bare Naked Ladies. From Space. From. Freaking. Space.

I find this to be a beautiful example of how we can use technology to virtually bring special guests to a physical classroom. In Spring 2011 I attended a Video for Learning Lab at the Masie Center and experienced this technique. We met with virtual visitors from the CIA and CNN via Skype. Our facilitator asked them to speak for a few minutes about how they used video for learning, then we opened the floor for questions from the students. One of the visitors even asked to be “left on” so he could attend the next exercise we were going to do.

I was still at Intel at the time and working on the New Employee Orientation (NEO). One of the chief complaints from new employees was that we did not have a section on benefits during the first day orientation class. The benefits class is a virtual class offered once a month because the benefits team didn’t have the bandwidth to have someone teach the full session every other week when NEO was run. If you know anything about new employees or remember what it’s like to be a new employee, then you know that one of the biggest thing on their minds is benefits. I tried to convince our organization that we should partner with the benefits team to have someone virtually visit the class via video for 15-20 minutes to answer some of the students’ burning questions. It wouldn’t be as robust as the class, but at least we could calm some fears and show we care with a real human touch.

It didn’t end up happening at Intel but I keep this idea in my back pocket, waiting for the right opportunity. I’ll let you know how it goes.

10 Tools: Pinterest Review

I’ve been using Pinterest for a few things over the course of the month. I was eager to see how I might use it to organize a project or utilize it for a learning activity.

Pinterest Basics:

  1. Pinterest is a way to organize photos, images, and videos. They are called pins and you share them by pinning them to a board.
  2. You create boards to act as a album for a group of related pins.
  3. You can create secret boards that don’t show up for others in searches.
  4. You can invite others to pin to your boards by entering their email addresses.
  5. You can follow other Pinterest users. They can follow you.
  6. If you log in via facebook it will post on your behalf unless you tell it not to.

I created three boards to play around with in Pinterest. One collected ideas for a kindergarten Valentine’s party. The next is an on-going collection of ideas for an end-of-year gift for my child’s teacher. The last was an unsuccessful attempt to gather ideas for a welcome/info book for my beach house.

What I learned

  • Pinterest is spectacular at providing inspiration. Keyword searches connect you to incredible creativity and delightful results. I’m beginning to suspect that Martha Stewart is no longer needed. Popular pins include DIY, home decor, crafts, wedding planning, travel, cars, and art. 
  • It really is photo-based. The website you link to has to have a photo or it won’t pin. I ran into this issue when I found some great templates I wanted to pin for my welcome/info book, but I couldn’t pin them. It doesn’t work well for project planning for this reason.
  • I don’t really enjoy following others in Pinterest. I use it more to farm for ideas via searches.
  • If you do the “shelf elf” at Christmas time Pinterest is the place for you.

Application to Virtual Learning

I could see utilizing Pinterest in a couple of ways for virtual learning. If there isn’t a mechanism in your platform for creating student profiles or sharing headshots you might give the following instructions:

You’ve been invited to post on the XYZ Course Pinterest board.

  • Please pin a headshot on the board.
  • Tell us in the “Describe your pin…” section why you are taking the course and how you hope to use your learning after the course.
  • Look at pins from other students. Comment on at least three of them.

It could also be a way to gather ideas for a class project to apply the learning or a way to demonstrate how they applied the learning back on the job after the class.

How would you use Pinterest for a learning event?

Next Tool: Flipboard

10 Tools Challenge (1-5)

I had a really difficult time coming up with a list of 10 tools. I used Jane’s list of Top 100 Tools, but I already use a great number of them and others required subscriptions. I’m sticking to 100% free tools and apps for this challenge. I also fretted that new tools would debut this year that I’d like to include and I didn’t want to be married to a specific list. As a compromise, I chose 5 that I promise to review. The other 5 I’ll discover over the year. Deal?

Here is the list of 5:

  1. Pinterest. Yeah, yeah, I know. I’m just now getting around to Pinterest. I thought it was just DIY and wedding planning, but I can see potential for gathering classroom resources and asking students to contribute. I’m also using it to plan a kindergarten Valentine’s Day party.
  2. Flipboard. This one really intrigues me and I think it will help me clean up some clutter of buttons on my phone and tablet home screens. It’s a customized one-stop shop for your news and social networks. It’s also visually stunning if you can trust the demo.
  3. Open Badges. I love having quick, visual ways to scan information. I also really miss my Girl Scout sash and all those badges. People love earning badges and will go a little farther just to get one. It’s motivation to learn by status and recognition.
  4. Pocket. I am forever emailing myself links to read later. They clutter my inbox and end up getting deleted during angry inbox cleaning sessions, never to be read. Pocket is a bookmarking service that delivers content in an organized way to your phone or tablet and stays the heck out of your inbox.
  5. Avatar Generators. I love sharing avatars in virtual learning environments. Many people don’t photograph well and dread sharing photos. Avatars are fun and can be customized to reflect hobbies and interests. I’ll review a number of avatar generators and share what I create with each one, features, etc.

For each tool or app I share I will try to demonstrate how it can be used in the virtual classroom. It’s possible I’ll find something that I can’t tie in, but is so great I just have to share. I’ll be clear if that’s the case. Stay tuned. I’ll review Pinterest and share my boards at the end of February.

Take Jane Hart’s 10 Tools Challenge in 2013

10_tools_challengeThe idea: choose 10 tools you’d like to investigate to use personally or professionally and try one out (roughly) each month this year. You could take the challenge yourself or follow my investigations.

If you choose to participate, I suggest following Jane Hart’s guidelines, summarized below:

  1. Select the 10 tools now or as you go. Make it something personally or professionally useful. Here is Jane’s list of Top 100 Tools to inspire you.
  2. Write an initial blog post or tweet to kick it off. Optional: leave a comment on Jane’s bog, Learning in the Social Workplace, to let her know you are participating.
  3. Write a monthly post featuring your tool review.
  4. At the end of the year, write a reflection post summarizing the experience.

Look for my list of ten next week and my first review in February!

Virtual Facilitator Training Part 3: Develop a Virtual Body Language

The number one concern among prospective new virtual facilitators is that they loose the ability to read the participants’ body language. This is the key feedback mechanism for face-to-face instructors. They understand the pull of other distractions like email, Facebook, and other digital bombardment. Facilitators fear that participants may be losing interest and they will have no way to know it.

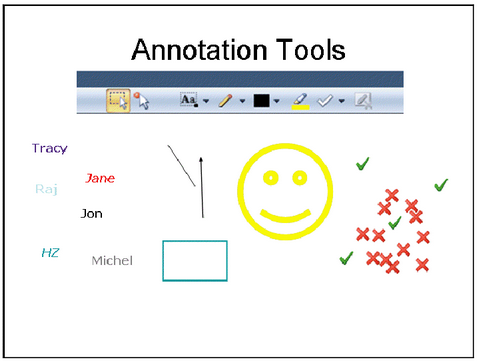
The virtual facilitator has to establish a “virtual body language” that can be interpreted using the application sharing software. Many packages include icons or color boxes that can be used to communicate the current mood. The facilitator must ask for feedback frequently in the beginning of the session to set the expectation for use. Colors and icons can be reassigned from their designated meanings as needed by the facilitator. “X” and check mark symbols can be used for a quick yes/no vote.

Here are some specific strategies for creating virtual body language.

  • Give participants a quick “play session” with the tools to make sure they feel comfortable using them. It’s a fun way to get them physically involved early on and increase the odds of active participation. If the session is small enough, ask them to use the text tool to write their first name on the screen. You can check the names against the attendee list and check in with anyone who hasn’t completed to see if they need help. Immediately they know you are paying attention to who is participating and who is not.
  • Remind participants to use the feedback status/icons in the platform to let you know how the session is going. At the beginning of each the session, ask everyone to change their status to a particular mode (not the default) then back again so that you know they are aware of how to use it.
  • Leave the chat functionality enabled. Remind participants to use it. Use it yourself to ask open-ended questions for them to respond.
  • Use drawing and annotation tools to call attention to items on a slide the same way you would on a whiteboard in a meeting room.
  • Invite participants to use the annotation tools any time they like. I encourage use of the “X” and check mark symbols to let me know if they like an idea (check), agree with a comment someone else made (check), disagree (X), or want me to stop for clarification (X). Yes, sometimes people draw funny things to entertain themselves, but you know what? They can’t do email when they are drawing on my slide AND studies show that people retain more auditory information when they doodle.
  • Call participants by name and use the attendee list  to call on them to answer questions.
  • Allow participants to contribute the content as often as possible. Your role is to guide the conversation in the right direction to the topics to be covered, not to tell what the topics are. When they use the annotation tools to contribute they can’t do email or really anything else. You have them mentally and physically engaged.

Can you think of other ways to establish virtual body language? Please share in the comments.


The Webinar Manifesto

Live blogging from Learning 2012

I had the opportunity to hear from Matthew Murdoch and Treion Muller,  the authors of The Webinar Manifesto. We definitely play for the same team when it comes to doing interactive live virtual training. You can join their revolution by signing the Manifesto.

Matthew and Treion covered 3 of the topics in the book during the session. Here are my notes with additional resources that I think support their points.

Don’t Default
Don’t simply use the default settings in your platform. Learn about all of tools available to make the session come alive. Think about how you could use them to to allow for maximum participation.

  1. Read the manual
  2. Apply the Manual
  3. Write your own manual

Shut Down the Ugly
Channel your inner marketer. Learn some basic graphic design rules and apply them to your communications and visuals.

  1. Email Invitations: Your invitations should look as good as your visuals for the presentation. Include a value proposition so learners know what they will get out of it. “The words you use should be just as beautiful as the graphics you use.” 9 Must-Have Components of Compelling Email Copy.
  2. Social Media: This is just as important as email. Again, don’t default. Make sure that you use a relevant branding image for the account and include links to make it easy for participants to register. Don’t post more than 3-4 times per week or it becomes noise. Try different benefit messages for wider appeal.
  3. Ban Ugly Slides: Limit the amount of text to a powerful phrase or two. Use relevant, teachable graphics. Here is an example of a PowerPoint makeover by Garr Reynolds of Presentation Zen.

Captivate or Alienate
Your visuals and the flow of your session must be dynamic. You are competing with email, texts, and Sudoku. These distractions will always be there, but you can create anticipation by using powerful images and well planned activities. I write about this in Is “Webinar a Dirty Word?

  1. Create Virtually Accountability:  Set the expectation for participating verbally, visually, and kinesthetically. Begin the session with a highly interactive inclusion activity and let participants know they will use chat or annotation tools to participate.
  2. Don’t Mute: Don’t silence participants. Invite verbal participation throughout the session.
  3. Set the stage: Let participants know that this is not your usual webinar. Participants may be called upon by name.
  4. Hang 10… count to ten after asking a question. Say out loud, “I’ll give you some time to think about it.”
  5. Visual: Open their eyes. Map it… where we are, where we are going… use graphics.
  6. Kinesthetic–Push: use the mouse, move around, Pull: Download. Play: Scavenger hunt. Come back and contribute. Never break for more than 5 minutes for an activity.

Surviving the SME

Live Blogging from Learning 2012. Thanks to the participants of session 162 for these great tips!

Working with a Subject Matter Experts (SMEs) can be challenging.  Dealing with conflicting schedules, roles and responsibilities, and accountability issues can ruffle the most seasoned ISD. Below are three profiles of challenging SMEs and how to get the most from them.

The Buddy
This SME has been a friend for many years. They don’t understand the underlying processes you use to get the job done and rely on you to “just take care of everything”. They often ask to skirt the process and don’t understand why they have to “follow the rules”.

  • Start with an open and direct conversation about roles and responsibilities. Set deadlines and do a periodic pulse check. Find out what else your buddy is working on and make sure a realistic schedule in place. Collaborate on the deadline up front. Does anyone have constraints that will affect the deadline?
  • Clarify roles. Sometimes SMEs try to take on the role of designer and the buddy might impose in this way. It is important to help them understand how they fit into the big picture. What part do they play? What are the consequences and impact to others working on the project if they don’t fulfill that role? Establish accountability.
  • Many times the SME is a long time instructor you have gotten to know over the years and many course updates. This buddy can be very invested in the content and think of the course as “their baby”. You have to help them become a change agent so milestones are not delayed because of the attachments to the course. One way to do this is to share needs assessment data with the SME. Appeal to their passion to meet learner needs with the data. Another way is to recruit new instructors to add new ideas. This introduces some competition and might elicit the cooperation you need.
  • Friend SMEs sometimes think they can skirt the process and still get something done. It is important to communicate that you can’t take shortcuts or the project will fall apart. It’s not about “doing them a favor,” it’s about doing it right.

The Historian
The historian is an expert on a product or process that has been in place for many years. They may have been involved in previous updates. Often they are highly invested in the last version and may not agree with new updates.

  • Depending on the topic, you can get sucked into the history. It may be  fascinating, but you need to keep them on track. Find a way to create a balance between respect for the SME’s opinion and sticking to the timeline, not losing sight of the task. Demonstrate respect to the history while still moving forward.
  • Historians may be well respected in the organization and they may have great influence. Focus on bringing them into the project and making them part of the change. Communicate how their ongoing participation helps meet the goal.
  • Decide when to cut your losses.
  • Where is the accountability? Could you leverage a project manager who might have more leverage to have a direct conversation about risk to the project. Might need to elevate to the SME’s supervisor.
  • Stress the value of the person’s contribution. Clearly define the roles and responsibility, and were they add value.

Out to Lunch
This SME may be invested in the project and even great to work with int he beginning, but slowly begins to disappear. Review meetings get cancelled because of more important work meetings. Deadlines are missed. They are just too busy.

  • Set a regular meeting. Even if it is only a 15 minute chick-in. Get buy-in early that this meeting will happen. It can be rescheduled, but not cancelled. Use virtual presentations if needed to make the meeting more convenient.
  • Be persistent. If you keep calling and emailing them you will stay on their radar.
  • Ask to observe the SME on-the-job to better understand and get what you need. They can continue working while you collect data.
  • Build good relationships. SMEs tend to come around and give you more time if you take genuine interest in them. Appreciate them… have a luncheon for them to recognize them and demonstrate why their involvement is important.
  • Do you third party project manager who can “be the bad guy” to keep everyone on track? This can help to put the SME and you on the “same team”. One participant shared this method. The project plan is posted and project manager dials into the first 5 min of every meeting to revisit the plan. This person acts as a mediator to help resolve time conflicts and manages resource allocation.
  • Use Outlook to assign tasks. Send a weekly recap email to remind about tasks and thank those who have already turned in on time. You can also block work time on their calendar to help them carve out time to do the work.

General Advice

  • Be very clear about roles and what everyone brings to the table. Even if you’ve worked with the SME before, don’t assume they understand the design and development process. Be clear about what content and data they need to provide so that the project will be successful.
  • If you use Articulate, (and you don’t want them to try to design) don’t share that it comes from powerpoint!
  • Communucate, communucate, communucate… keep them up to date on developments. Share the product… follow up when the learning product is final and give them credit as a contributor.
  • Respect their time and schedule them in meetings only when needed. They will be more likely to attend meetings if they know they have an active role.
  • Recognize the value of their contribution. Let them know how important their expertise is. Send them thank you cards and reward cards… not just at end, but at milestones throughout. Hold an annual lunch for your SMEs and give them some public recognition.
  • If scheduling conflicts are an issue, schedule lunch to get the review meeting. Pay for lunch. Get offsite if possible.